


Any environment can be customized with a unique version of Python and associated packages, which helps in avoiding unnecessary conflicts between versions within different projects or tasks.
Benefits of Anaconda
Anaconda includes a conda package manager that allows you to install, update, and manage packages and their dependencies. It also allows you to create isolated environments for different projects, which helps avoid conflicts between libraries and versions.
For example, Anaconda is characterized by the following strengths:
- Libraries already pre-installed: includes many libraries that can be used for big data analytics and machine learning, such as
NumPy,pandas,scikit-learn,TensorFlow, andPyTorch. These libraries help achieve excellent optimization and compatibility, allowing developers to focus on solving problems rather than installing dependencies. - Tool integration: works easily with well-recognized platforms such as
JupyterNotebook,JupyterLab, andRStudio, which in turn can be extremely useful for data experts. It allows users to quickly create interactive reports and visualizations. - Scalability flexibility: suitable for implementing projects of varying complexity and scale. You can start with simple scripts and move on to complex applications without having to change tools.
- Lively community and regular support: an active base of users and developers. They are busy helping each other and contributing to the development of the project. This community provides extensive resources and documentation, making it easy to learn.
- High-quality data visualization: effective visualization tools are offered, including
Matplotlib,Seaborn, andPlotly, allowing you to create clear graphs and charts to better present information. Data visualization is an important part of analysis, and these tools make it accessible to all. - Data management: provides a variety of tools to work efficiently with data, including data manipulation and storage. This allows analysts to handle large amounts of data with minimal effort.
Conda-forgechannel capabilities: aconda-forgechannel is available that offers a variety of packages, which in turn are actively supported by the community, extending the capabilities of the standard distribution. This gives access to the latest versions of libraries and tools.- Security: updates regularly to keep your data science projects secure. This is important to protect your data and develop secure applications.
- Enterprise solutions: commercial versions of Anaconda Enterprise are available that offer additional features and support.
Anaconda installation process on Ubuntu 22.04

Next, let's take a look at the installation process of the manager.
Step #1 Download Anaconda
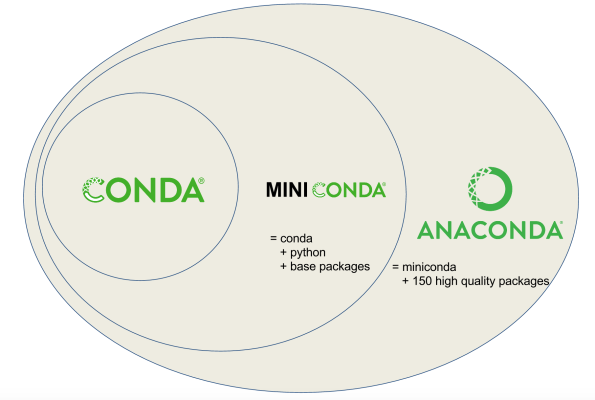
Select and download either Anaconda or Miniconda based on your needs. Miniconda is a lightweight version of Anaconda that installs only basic packages.
Step #2. Open Terminal
Launch Terminal using the Ctrl+Alt+T shortcut or find it in the applications menu.
Step #3. Connect to your VPS
Connect to your VPS with root privileges via SSH. After that you should update your system with APT:
sudo apt update
sudo apt upgrade
Step #4. Navigate to the Anaconda installation file
Navigate to the directory where the Anaconda installation file is located. If it is in the Downloads folder, run the command:
cd ~/DownloadsStep #5. Run the installer
We need to run the installer script, resort to the command:
bash Anaconda3-2021.05-Linux-x86_64.sh(Replace Anaconda3-2021.05-Linux-x86_64.sh with the name of your downloaded file).
Step #6. Follow the installation instructions
Go through the installation process by following the on-screen instructions.
Step #7. Executing Anaconda
Once the installation is complete, execute Anaconda using the command:
source ~/.bashrcThe shell will now recognize Anaconda commands.
Step #8. Verify the success of the installation
Verify that the installation was successful by running the command:
conda --versionYou should see the installed version in front of you.
Step #9. Create a new Anaconda environment
To work on more than one project at the same time, create a new environment using this command:
conda create --name myenv python=x.xReplace myenv with the desired environment name and x.x with the desired Python version.
Step #10. Download all the packages you need
Download the packages you need using the conda command:
condainstallnumpyStep #11. Deactivate the environment (optional)
When you are done working with the Anaconda environment, you can deactivate it:
condadeactivatemyenvUninstalling Anaconda from Ubuntu 22.04: Step-by-step instructions
Starting the terminal
The first thing you need to do is open the terminal, which is the main tool for interacting with your system via the command line. You can do this in a number of ways, either by pressing the keyboard shortcut Ctrl+Alt+T or by selecting Terminal from the applications menu of your desktop. Opening the terminal is an important step, as all further commands will be executed in this window.
Deactivating the Anaconda environment
Before proceeding with the uninstallation process, make sure that all Anaconda environments are deactivated. This will help avoid possible conflicts and errors during the uninstall process.
To do this, run the following command:
condadeactivateThis command will end the active sessions of any environments you may have previously started.
Uninstalling Anaconda
Now you can move on to the Anaconda uninstallation process itself. To do this, you will need to use the install script with the -uninstall option. You will need to navigate to the directory where Anaconda was installed and then run the following command:
bash ~/anaconda3/uninstall-Anaconda3.shThis step will initiate the uninstall process and will start removing all Anaconda components from your computer.
Cleaning the configuration files
Although the previous command should remove the main Anaconda components, some entries may still be present in shell configuration files such as .bashrc, .zshrc or .profile. These files contain environment settings and may store references to Anaconda.
To edit them, open the .bashrc file with a text editor such as Nano:
nano ~/.bashrcIn the editor that opens, look for lines related to Anaconda or Conda. Delete these lines to clear the file of unnecessary entries. After making your changes, remember to save the file and close the editor.
Deleting the remaining files
To completely delete all remaining Anaconda files, use the rm command. Keep in mind that this command starts irrevocably deleting all files and folders, so be careful:
rm -rf ~/anaconda3If you installed Anaconda in a different directory, make sure you specify the correct directory path.
Verifying successful uninstallation
After completing all the above steps, it is important to verify that Anaconda has indeed been uninstalled from your computer. To do so, run the following command:
conda --versionIf the system reports that the command was not found, it means that you have successfully uninstalled Anaconda and freed up space on your disk.
Conclusion
Anaconda is one of the widely recognized Python distributions that is uncomplicated to use and suitable for both beginners and advanced data experts. Despite its many benefits, it may sometimes be necessary to uninstall this platform.