Installing a mail server on CentOS 7 can be done in several ways, but one of the most common is to use a combination of Postfix and Dovecot.
Postfix is a sender program and is one of the most popular mail servers in the world. Dovecot, on the other hand, is a mail server that is used to retrieve email using IMAP or POP protocol.
What is Exim ?
Exim is a mail transfer agent (MTA) that is commonly used in Unix-like operating systems. Exim is freeware distributed under the terms of the GNU (General Public License), and is a versatile and flexible e-mail tool with extensive features for checking incoming e-mail.
What is Dovecot ?
Dovecot is an open source IMAP and POP3 mail server for Linux/UNIX-like systems. Security has been the cornerstone of this product's focus on flexibility and speed.
What is Roundcube ?
Roundcube is a web-based email interface that provides the ability to work with your mailboxes using IMAP and SMTP. The application has powerful functionality and is comparable in capabilities to desktop email clients such as Outlook Express or Mozilla Thunderbird.
Installing Apache + MySQL + PHP
Log in via SSH to your virtual server.
Next you need to update the system, enter the command:
# sudo yum update -yAfter updating the system, a message like this will appear.

Install Apache
To install Apache on your virtual server, enter the command:
# sudo yum install httpd -yAfter installation, start Apache:
# sudo systemctl start httpd.serviceAfter that, go to - http://ServerIP/ and check Apache is working properly
If everything works correctly, enter the command to autorun Apache on the virtual server:
# sudo systemctl enable httpd.serviceInstall MySQL (MariaDB)
To download, use the command:
# sudo yum install mariadb-server mariadb -yAfter the download and installation is complete, you need to run MariaDB:
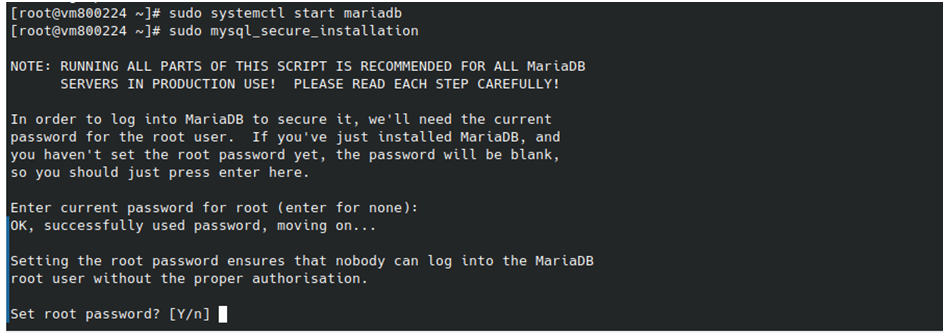
# sudo systemctl start mariadbRun the secure installation script, which will remove insecure settings:
# sudo mysql_secure_installationEnter the root password, since you just created the database, it is empty by default. Next agree to the settings, enter "Y" everywhere. Enter a new password, confirm it, and again agree to the "Y" changes.

MariaDB is installed.
Install PHP
To install PHP, enter the command:
# sudo yum install php php-mysql -yNext, restart Apache so that it can run PHP:
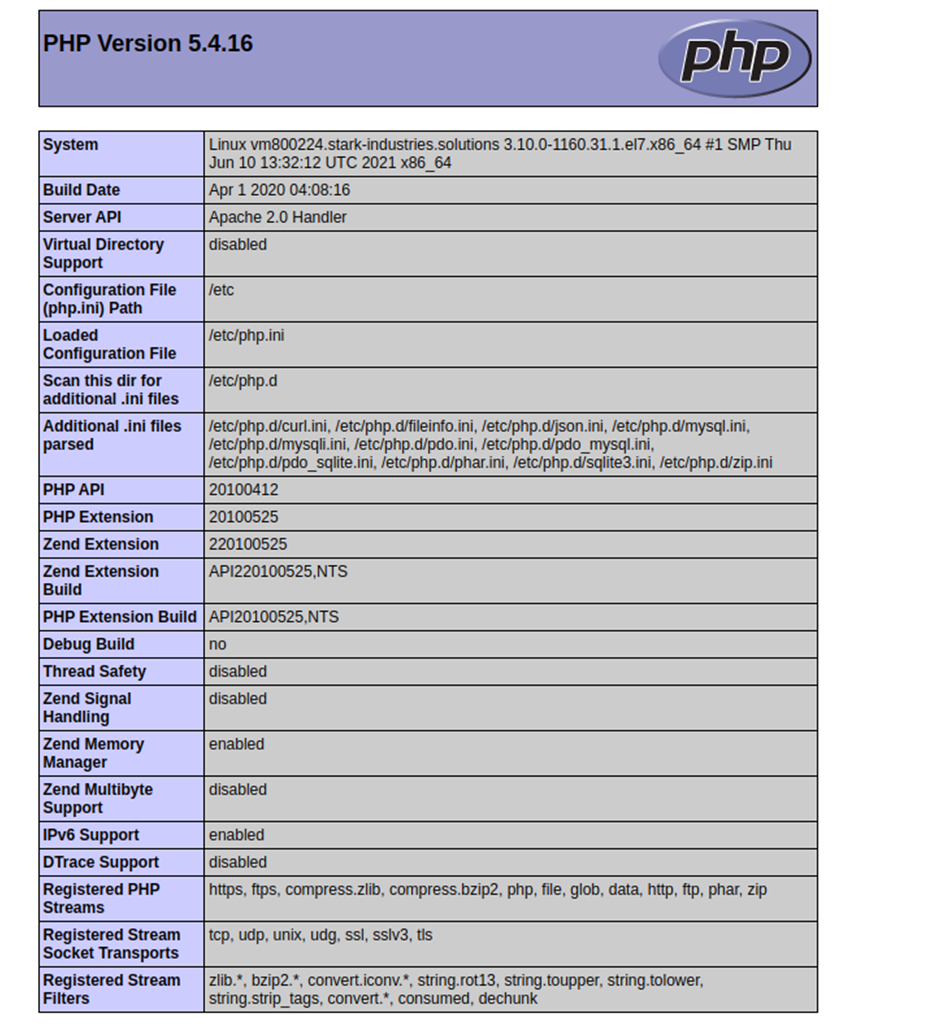
# sudo systemctl restart httpd.serviceTo test PHP's performance, enter you need to make a file, such as index.php using this command:
# echo "<?php phpinfo(); ?>" > /var/www/html/index.phpNow open the link in your browser - http://ServerIP/index.php You should see a page with PHP parameters. 
Next you need to install the package to support MariaDB in PHP:
# sudo yum -y install php-mysql php-gd php-ldap php-odbc php-pear php-xml php-xmlrpc php-mbstring php-snmp php-soap curl curl-develAfter that you restart Apache:
# sudo systemctl restart httpd.serviceDone. You have installed Apache, MySQL and PHP on the virtual server.
Connecting additional repositories
You will need to connect an additional repository to install all the components.
# sudo yum install epel-releaseCreating a vexim database
To create a connection between all the components of the chain you need to use one database. Connect to the MySQL server:
# mysql -u root -pCreate a database, you must specify your own password:
CREATE DATABASE vexim;
GRANT ALL ON vexim.* to vexim@localhost identified by 'password';
quit
Install Postfixadmin
In case not all PHP modules are installed, an additional installation is required.
# yum -y install php-imap php-mbstring php-pdo php-mysql php-cliDownload Postfixadmin and install it in the /var/www/html/postfixadmin folder.
# wget http://sourceforge.net/projects/postfixadmin/files/postfixadmin/postfixadmin-3.0/postfixadmin-3.0.tar.gz
# tar xpf postfixadmin-3.0.tar.gz
# mv postfixadmin-3.0 /var/www/html/postfixadmin
# chown -R apache:apache /var/www/html/postfixadmin
# rm postfixadmin-3.0.tar.gz
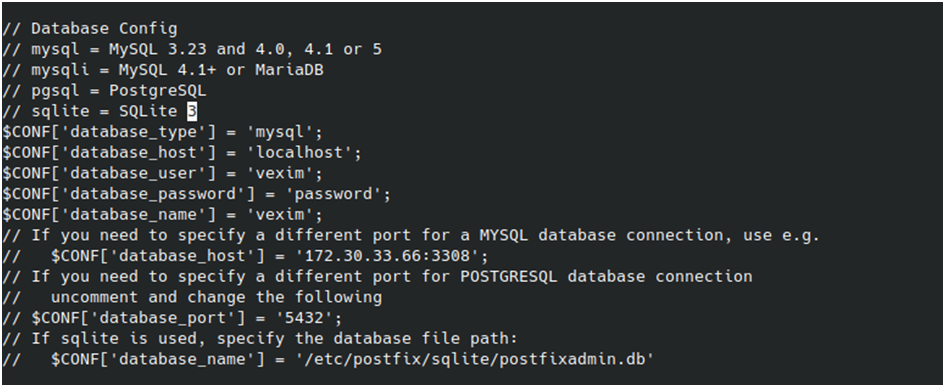
# cd /var/www/html/postfixadmin > # vi config.inc.php
Edit the config .inc.php configuration file:


Installing Dovecot
# yum -y install dovecot dovecot-mysqlRename the default config so that we can revert to it if necessary:
# mv /etc/dovecot/dovecot.conf /etc/dovecot/dovecot.conf-orig
# vi /etc/dovecot/dovecot.conf
Save the following entries to the dovecot.conf configuration file :
## Dovecot configuration file

base_dir = /var/run/dovecot/

auth_default_realm = site.com

auth_mechanisms = plain login cram-md5

protocols = imap pop3

listen = *

disable_plaintext_auth = no

dotlock_use_excl = yes

first_valid_gid = 5

first_valid_uid = 25

mail_location = maildir:/var/vmail/%d/%u

mail_privileged_group = mail

passdb {

  args = /etc/dovecot/dovecot-mysql.conf

  driver = sql

}

service auth {

  unix_listener auth-client {

    group = exim

    mode = 0660

    user = exim

  }

  unix_listener auth-master {

    group = exim

    mode = 0600

    user = exim

  }

  user = root

}

ssl = no

userdb {

  args = /etc/dovecot/dovecot-mysql.conf

  driver = sql

}

verbose_proctitle = yes

protocol imap {

  imap_client_workarounds = delay-newmail tb-extra-mailbox-sep

}

protocol pop3 {

  pop3_client_workarounds = outlook-no-nuls oe-ns-eoh

  pop3_uidl_format = %08Xu%08Xv

}

protocol lda {

  auth_socket_path = /var/run/dovecot/auth-master

  postmaster_address = info@site.com

}
To configure access to the database, create a separate config file dovecot-mysql.conf
# vi /etc/dovecot/dovecot-mysql.conf
and write the following settings into it:
## Dovecot database configuration

driver = mysql

connect = host=localhost dbname=vexim user=vexim password=password

default_pass_scheme = CRAM-MD5

password_query = SELECT `username` as `user`, `password` FROM  `mailbox` WHERE `username` = '%n@%d' AND `active`='1'

user_query = SELECT 93 AS `uid`, 93 AS `gid` FROM `mailbox` WHERE `username` = '%n@%d' AND `active`='1'
Installing Exim
# yum -y install exim exim-mysql cyrus-sasl
# mv /etc/exim/exim.conf /etc/exim/exim.conf-orig
# vi /etc/exim/exim.conf
Modify the default config while keeping a backup copy.
######################################################################

#                    MAIN CONFIGURATION SETTINGS                     #

######################################################################

primary_hostname = mail.site.com

hide mysql_servers = localhost/vexim/vexim/password

domainlist local_domains = ${lookup mysql{SELECT `domain`

                            FROM `domain` WHERE

                            `domain`='${quote_mysql:$domain}' AND

                            `active`='1'}}

domainlist relay_to_domains = ${lookup mysql{SELECT `domain`

                            FROM `domain` WHERE

                            `domain`='${quote_mysql:$domain}' AND

                            `active`='1'}}

hostlist relay_from_hosts = localhost:127.0.0.0/8:192.168.1.0/24

auth_advertise_hosts = *

acl_not_smtp = acl_not_smtp

acl_smtp_rcpt = acl_check_rcpt

acl_smtp_data = acl_check_data

qualify_domain = site.com

qualify_recipient = site.com

allow_domain_literals = true

exim_user = exim

exim_group = exim

never_users = root

rfc1413_query_timeout = 0s

sender_unqualified_hosts = +relay_from_hosts

recipient_unqualified_hosts = +relay_from_hosts

ignore_bounce_errors_after = 45m

timeout_frozen_after = 15d

helo_accept_junk_hosts = 192.168.1.0/24

auto_thaw = 1h

smtp_banner = "$primary_hostname, ESMTP EXIM $version_number"

smtp_accept_max = 50

smtp_accept_max_per_connection = 25

smtp_connect_backlog = 30

smtp_accept_max_per_host = 20

split_spool_directory = true

remote_max_parallel = 15

return_size_limit = 70k

message_size_limit = 64M

helo_allow_chars = _

smtp_enforce_sync = true

log_selector =

    +all_parents

    +connection_reject

    +incoming_interface

    +lost_incoming_connection

    +received_sender

    +received_recipients

    +smtp_confirmation

    +smtp_syntax_error

    +smtp_protocol_error

    -queue_run

syslog_timestamp = no

######################################################################

#                       ACL CONFIGURATION                            #

#         Specifies access control lists for incoming SMTP mail      #

######################################################################

begin acl

acl_not_smtp:

        deny message = Sender rate overlimit - $sender_rate / $sender_rate_period

        ratelimit = 50 / 1h / strict

        accept

acl_check_rcpt:

  deny    message          = "Lookup failed"

          condition = ${if eq{$host_lookup_failed}{1}}

  accept  hosts = :

  deny    message       = "incorrect symbol in address"

          domains       = +local_domains

          local_parts   = ^[.] : ^.*[@%!/|]

  deny    message       = "incorrect symbol in address"

          domains       = !+local_domains

          local_parts   = ^[./|] : ^.*[@%!] : ^.*/\.\./

  accept  local_parts   = postmaster

          domains       = +local_domains

  deny    message       = "HELO/EHLO required by SMTP RFC"

          condition     = ${if eq{$sender_helo_name}{}{yes}{no}}

  accept  authenticated = *

  deny    condition     = ${if eq{$sender_helo_name}

    {$interface_address}{yes}{no}}

          hosts         = !127.0.0.1 : !localhost : *

          message       = "My IP in your HELO! Access denied!"

  deny    condition     = ${if match{$sender_helo_name}

    {N^d+$N}{yes}{no}}

          hosts         = !127.0.0.1 : !localhost : *

          message       = "Incorrect HELO string"

  warn

        set acl_m0 = 30s

  warn

        hosts = +relay_from_hosts:4.3.2.1/32:192.168.1.0/24 #disable waits for 'friendly' hosts

        set acl_m0 = 0s

  warn

        logwrite = Delay $acl_m0 for $sender_host_name

[$sender_host_address] with HELO=$sender_helo_name. Mail

from $sender_address to $local_part@$domain.

        delay = $acl_m0

  accept  domains       = +local_domains

          endpass

          message       = "No such user"

          verify        = recipient

  accept  domains       = +relay_to_domains

          endpass

          message       = "i don't know how to relay to this address"

          verify        = recipient

  deny    message       = "you in blacklist - $dnslist_domain n $dnslist_text"

          dnslists      = opm.blitzed.org :

                          cbl.abuseat.org :

                          bl.csma.biz

accept  hosts         = +relay_from_hosts

deny    message       = "Homo hominus lupus est"

acl_check_dаta:

deny malware = */defer_ok

message = "Your message contains viruses: $malware_name"

accept

######################################################################

#                      ROUTERS CONFIGURATION                         #

#               Specifies how addresses are handled                  #

######################################################################

#     THE ORDER IN WHICH THE ROUTERS ARE DEFINED IS IMPORTANT!       #

# An address is passed to each router in turn until it is accepted.  #

######################################################################

begin routers

dnslookup:

  driver = dnslookup

  domains = ! +local_domains

  transport = remote_smtp

  ignore_target_hosts = 0.0.0.0 : 127.0.0.0/8

  no_more

system_aliases:

    driver      = redirect

    allow_fail

    allow_defer

    data = ${lookup mysql{SELECT `goto` FROM `alias` WHERE

            `address`='${quote_mysql:$local_part@$domain}' OR

                `address`='${quote_mysql:@$domain}'}}

dovecot_user:

  driver = accept

  condition = ${lookup mysql{SELECT `goto` FROM

  `alias` WHERE

  `address`='${quote_mysql:$local_part@$domain}' OR

  `address`='${quote_mysql:@$domain}'}{yes}{no}}

  transport = dovecot_delivery

######################################################################

#                      TRANSPORTS CONFIGURATION                      #

######################################################################

#                       ORDER DOES NOT MATTER                        #

#     Only one appropriate transport is called for each delivery.    #

######################################################################

begin transports

remote_smtp:

  driver = smtp

dovecot_delivery:

  driver = pipe

  command = /usr/libexec/dovecot/deliver -d $local_part@$domain

  message_prefix =

  message_suffix =

  delivery_date_add

  envelope_to_add

  return_path_add

  log_output

  user = exim

address_pipe:

  driver = pipe

  return_output

address_reply:

  driver = autoreply

######################################################################

#                      RETRY CONFIGURATION                           #

######################################################################

begin retry

*                    *       F,2h,15m; G,16h,1h,1.5; F,4d,6h

######################################################################

#                      REWRITE CONFIGURATION                         #

######################################################################

begin rewrite

######################################################################

#                   AUTHENTICATION CONFIGURATION                     #

######################################################################

begin authenticators

auth_plain:

     driver = dovecot

     public_name = PLAIN

     server_socket = /var/run/dovecot/auth-client

     server_set_id = $auth1

auth_login:

     driver = dovecot

     public_name = LOGIN

     server_socket = /var/run/dovecot/auth-client

     server_set_id = $auth1

auth_cram_md5:

     driver = dovecot

     public_name = CRAM-MD5

     server_socket = /var/run/dovecot/auth-client

     server_set_id = $auth1
Uninstalling Postfix
# alternatives --config mta
# systemctl disable postfix
# systemctl stop postfix
# yum -y remove postfix
Setting up Postfixadmin
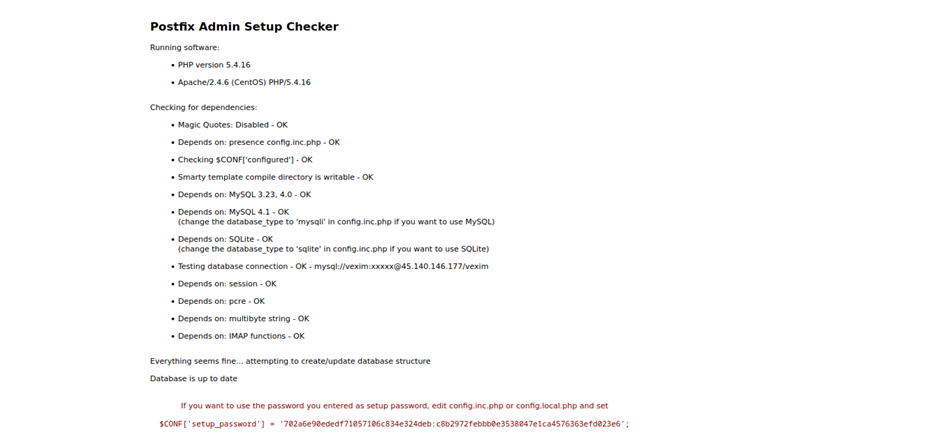
Go to http://server_ip/postfixadmin/setup.php and follow the installation instructions. After creating a superadmin, the installer will give you a password hash code:

It should be replaced in the config.inc.php file (in the root of the postfixadmin directory) instead of this line:

Then you need to log in under the created data, add the necessary domains and mailboxes.
Installing Roundcube
# yum -y install roundcubemailAfter installation you need to add the config to the web-server so that the script opens at http://server_ip/roundcubemail/.
# vi /etc/httpd/conf.d/roundcubemail.conf
Save the following data:
#

# Round Cube Webmail is a browser-based multilingual IMAP client

#

Alias /roundcubemail /usr/share/roundcubemail

Alias /webmail /usr/share/roundcubemail

<Directory /usr/share/roundcubemail/>

        Options none

        AllowOverride Limit

        Require all granted

</Directory>

<Directory /usr/share/roundcubemail/installer>

        Options none

        AllowOverride Limit

        Require all granted

</Directory>

# Those directories should not be viewed by Web clients.

<Directory /usr/share/roundcubemail/bin/>

    Order Allow,Deny

    Deny from all

</Directory>

<Directory /usr/share/roundcubemail/plugins/enigma/home/>

    Order Allow,Deny

    Deny from all

</Directory>
Apache must be restarted after writing:
# systemctl restart httpd.serviceFor further installation create a database, for this purpose connect to MySQL:
# mysql -u root -pand execute queries (specify your own data):
CREATE DATABASE roundcubedb;

CREATE USER roundcubeuser@localhost IDENTIFIED BY 'password';

GRANT ALL PRIVILEGES on roundcubedb.* to roundcubeuser@localhost ;

FLUSH PRIVILEGES;

quit
Next you need to open the installer http://server_ip/roundcubemail/installer and customize.
This completes the configuration, go to Roundcube http://server_ip/roundcubemail/, log in under the previously created (in Postfixadmin) box, make settings and use.