


WHMCS (Web Host Manager Complete Solution) is an automation system for hosting companies and ISPs. It offers functionality for customer management, billing, support and process automation. Here are the instructions on how to install this module.
STEP 1: Loading the module
Upload the module to the server via command line using scp:
scp /path/to/local/module-whmcs-billmanager.zip
username@remote_server:/path/to/remote/directory
Example if you are already in the folder with the file:
scp module-whmcs-billmanager.ziproot@77.92.122.212:/var/www/www-root/data/www/data-hub.online/You will then be prompted to enter your server password.
After uploading the file to the server, connect to the server via SSH and extract the file
ssh user@remote_serverYou will need to enter the server password.
Then you need to go to your project folder and where you uploaded the file
cd /var/www/path/to/destination/ The archive should be unpacked into the root of the project
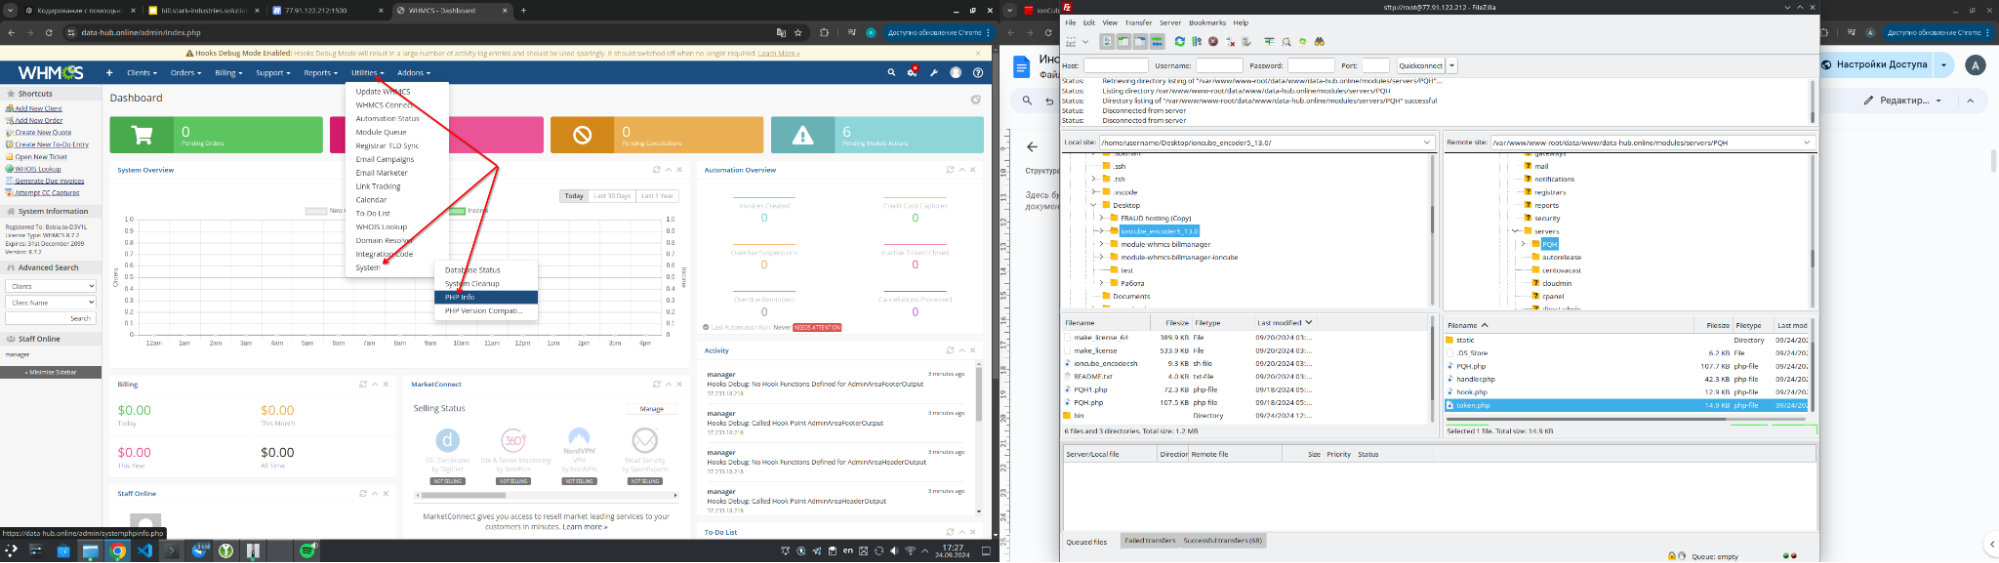
unzip module-whmcs-billmanager.zipIn this archive there are 3 versions of the module corresponding to the version of php on which whmcs works, to find out your version of php go to Utilities/System/PHP info.
Then you need to unzip the archive again for the version your whmcs supports.
For php 7.1, php 7.2, php 7.4 enter
unzip version7.1|7.2|7.4.zipFor php 8.1 enter
unzip version8.1For php 8.2 enter
unzip version8.2Then you need to (necessarily) grant permissions to the files, you can do this in the project folder by entering the command
chmod -R 755 modules/servers/PQH
The module is loaded.
Or Upload module to the server via FileZilla
On your computer, unzip the file module-whmcs-billmanager.zip
Then you need to unzip the archive of the version your whmcs supports:
Для версии php 7.1, php 7.2, php 7.4 архив version7.1|7.2|7.4.zip
Для версии php 8.1 архив version8.1
Для версии php 8.2 архив version8.2
Then connect to your server using filezilla.
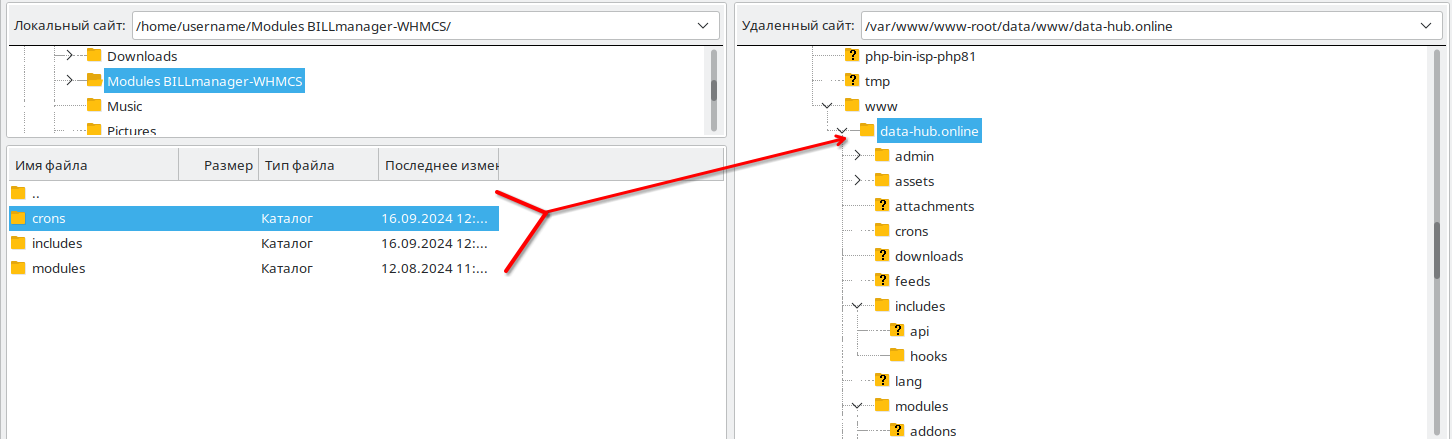
Transfer the files to the root folder of the site from the archive corresponding to your version of php (as in the screenshot below).
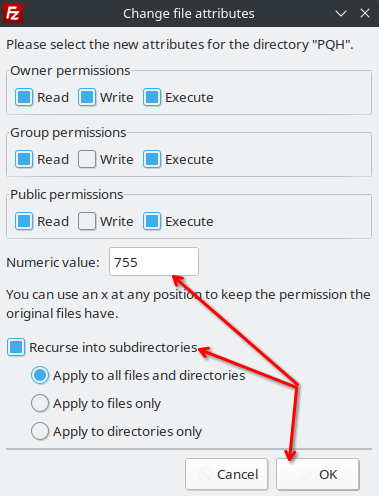
Then it is necessary (obligatory) to give rights to the folder and files to do this by going to the modules/servers folder and right click on the PQH folder and select file attributes in the pop-up window, write in the field numeric value 755 and check the box on recurse into subdirectories (as in the screenshot below).
The module is loaded.
STEP 2. Check IonCube
On our shared hosting, IonCube support and its version depends on the PHP version selected for the user. This is true for any line of hosting plans, as well as for virtual/dedicated servers with ISPManager panel installed.
Preliminary requirements for IonCube installation
If you have a server without any control panel, you may face the necessity of manual installation of IonCube.
The installation process may differ depending on your OS. Regardless of the OS, the first step is always to connect via SSH and get root access.
To install IonCube you need a machine with active and working web server, Apache or Nginx, and also installed PHP version from the list of supported IonCube Loader.
Step-by-step installation of IonCube
Important: the value of commands used to install IonCube Loader varies depending on some variables: PHP version on the server, PHP directory location and server architecture version. Here and in the future, we will highlight the values of these variables. In their place, you will need to substitute the appropriate values for your server during installation.
1 .Connect to the server via SSH.
2. Check the architecture of the current server:
uname -m
Exit
x86_64
As we can see from x86_64, our current server is running on a 64-bit architecture. Values of the i686 kind would indicate the opposite - a 32-bit architecture.
Next, go to the tmp directory and download the necessary archive:
For 64-bit systems:
cd /tmp
wget https://downloads.ioncube.com/loader_downloads/ioncube_loaders_lin_x86-64.tar.gz
For 32-bit systems:
cd /tmp
wget https://downloads.ioncube.com/loader_downloads/ioncube_loaders_lin_x86.tar.gz
After downloading the archive you should unzip it:
Since we have a 64-bit architecture in the example, we have downloaded and unzipped just such an archive.
tar -zxvf ioncube_loaders_lin_x86-64.tar.gz5. Go to the ioncube directory and look through the list of files.
cd ioncube/
ls -l
Conclusion
total 39260
-rw-rw-r-- 1 507 507  472192 Sep  9  2023 ioncube_loader_lin_4.1.so
-rw-rw-r-- 1 507 507  471968 Sep  9  2023 ioncube_loader_lin_4.2.so
-rw-rw-r-- 1 507 507  472768 Sep  9  2023 ioncube_loader_lin_4.3.so
-rw-rw-r-- 1 507 507  490752 Sep  9  2023 ioncube_loader_lin_4.3_ts.so
-rw-rw-r-- 1 507 507  475840 Sep  9  2023 ioncube_loader_lin_4.4.so
-rw-rw-r-- 1 507 507  494880 Sep  9  2023 ioncube_loader_lin_4.4_ts.so
-rw-rw-r-- 1 507 507  483360 Sep  9  2023 ioncube_loader_lin_5.0.so
-rw-rw-r-- 1 507 507  497632 Sep  9  2023 ioncube_loader_lin_5.0_ts.so
-rw-rw-r-- 1 507 507 1116768 Sep  9  2023 ioncube_loader_lin_5.1.so
-rw-rw-r-- 1 507 507 1155744 Sep  9  2023 ioncube_loader_lin_5.1_ts.so
-rw-rw-r-- 1 507 507 1139936 Sep  9  2023 ioncube_loader_lin_5.2.so
-rw-rw-r-- 1 507 507 1176704 Sep  9  2023 ioncube_loader_lin_5.2_ts.so
-rw-rw-r-- 1 507 507 1222328 Sep  9  2023 ioncube_loader_lin_5.3.so
-rw-rw-r-- 1 507 507 1275512 Sep  9  2023 ioncube_loader_lin_5.3_ts.so
-rw-rw-r-- 1 507 507 1512960 Sep  9  2023 ioncube_loader_lin_5.4.so
-rw-rw-r-- 1 507 507 1599584 Sep  9  2023 ioncube_loader_lin_5.4_ts.so
-rw-rw-r-- 1 507 507 1520056 Sep  9  2023 ioncube_loader_lin_5.5.so
-rw-rw-r-- 1 507 507 1602040 Sep  9  2023 ioncube_loader_lin_5.5_ts.so
-rw-rw-r-- 1 507 507 1485192 Sep  9  2023 ioncube_loader_lin_5.6.so
-rw-rw-r-- 1 507 507 1549640 Sep  9  2023 ioncube_loader_lin_5.6_ts.so
-rw-rw-r-- 1 507 507 1254608 Sep  9  2023 ioncube_loader_lin_7.0.so
-rw-rw-r-- 1 507 507 1316080 Sep  9  2023 ioncube_loader_lin_7.0_ts.so
-rw-rw-r-- 1 507 507 1355080 Sep  9  2023 ioncube_loader_lin_7.1.so
-rw-rw-r-- 1 507 507 1438760 Sep  9  2023 ioncube_loader_lin_7.1_ts.so
-rw-rw-r-- 1 507 507 1407568 Sep  9  2023 ioncube_loader_lin_7.2.so
-rw-rw-r-- 1 507 507 1489008 Sep  9  2023 ioncube_loader_lin_7.2_ts.so
-rw-rw-r-- 1 507 507 1316800 Sep  9  2023 ioncube_loader_lin_7.3.so
-rw-rw-r-- 1 507 507 1386880 Sep  9  2023 ioncube_loader_lin_7.3_ts.so
-rw-rw-r-- 1 507 507 1363392 Sep  9  2023 ioncube_loader_lin_7.4.so
-rw-rw-r-- 1 507 507 1430848 Sep  9  2023 ioncube_loader_lin_7.4_ts.so
-rw-rw-r-- 1 507 507 1401736 Sep  9  2023 ioncube_loader_lin_8.1.so
-rw-rw-r-- 1 507 507 1506216 Sep  9  2023 ioncube_loader_lin_8.1_ts.so
-rw-rw-r-- 1 507 507 1439016 Sep  9  2023 ioncube_loader_lin_8.2.so
-rw-rw-r-- 1 507 507 1546568 Sep  9  2023 ioncube_loader_lin_8.2_ts.so
-rw-r--r-- 1 507 507   10768 Aug  5  2022 LICENSE.txt
-rw-r--r-- 1 507 507  181104 Aug 15  2022 loader-wizard.php
-rw-r--r-- 1 507 507    4070 Sep  9  2023 README.txt
-rw-r--r-- 1 507 507   39548 Sep  9  2023 USER-GUIDE.pdf
-rw-r--r-- 1 507 507   11269 Sep  9  2023 USER-GUIDE.txt
As you can see, the archive contains many different versions of the module for different PHP versions. We need to find out which of these files we need for further installation.
6. Knowing your version of PHP (from the first step), the next step is to determine the location of the directory where you need to install IonCube Loader.
php -i | grep extension_dirOutput
extension_dir => /usr/lib/php/20210902 => /usr/lib/php/20210902The location /usr/lib/php/20210902 will be needed in the further process of installation. In Centos OS such folder may look like /usr/lib64/php/modules.
7. Copy IonCube files to the necessary directory.
sudo cp /tmp/ioncube/ioncube_loader_lin_8.1.so /usr/lib/php/202109028. Now it is necessary to make edits to the configuration files php.ini. They may have different locations in different server configurations:
sudo nano /etc/php/8.1/cli/php.ini          #для PHP CLI
sudo nano /etc/php/8.1/fpm/php.ini          #для PHP-FPM & Nginx
sudo nano /etc/php/8.1/apache2/php.ini      #для Apache2
Insert a line of the following kind at the very beginning of php.ini:
zend_extension = /usr/lib/php/20210902/ioncube_loader_lin_8.1.so9. Perform a restart of the webserver:
Apache Ubuntu/Debian
sudo systemctl restart apache2
Apache Centos/Rocky/Alma
sudo systemctl restart httpd
Nginx/PHP-FPM
sudo systemctl restart nginx
sudo systemctl restart php-fpm
10. Verify the installation is correct with the command:
php -vIf the installation is successful, the line with information about the current version of IonCube will be displayed as follows:
Output
PHP 8.1.2-1ubuntu2.17 (cli) (built: May  1 2024 10:10:07) (NTS)
Copyright (c) The PHP Group
Zend Engine v4.1.2, Copyright (c) Zend Technologies
    with the ionCube PHP Loader v13.0.2, Copyright (c) 2002-2023, by ionCube Ltd.
    with Zend OPcache v8.1.2-1ubuntu2.17, Copyright (c), by Zend Technologies
STEP 3. Add a server
Go to the admin panel.
System Settings/ServersClick Add New Server.
Fill out the form as on the screenshot below.
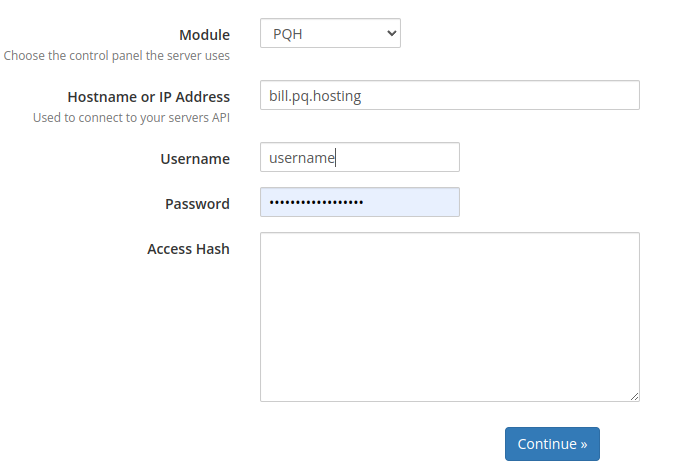
In the Module field find: PQH
In the Hostname or IP Address field enter: client.the.hosting
Then enter your account details (login, password) from client.the.hosting.
And click continue.
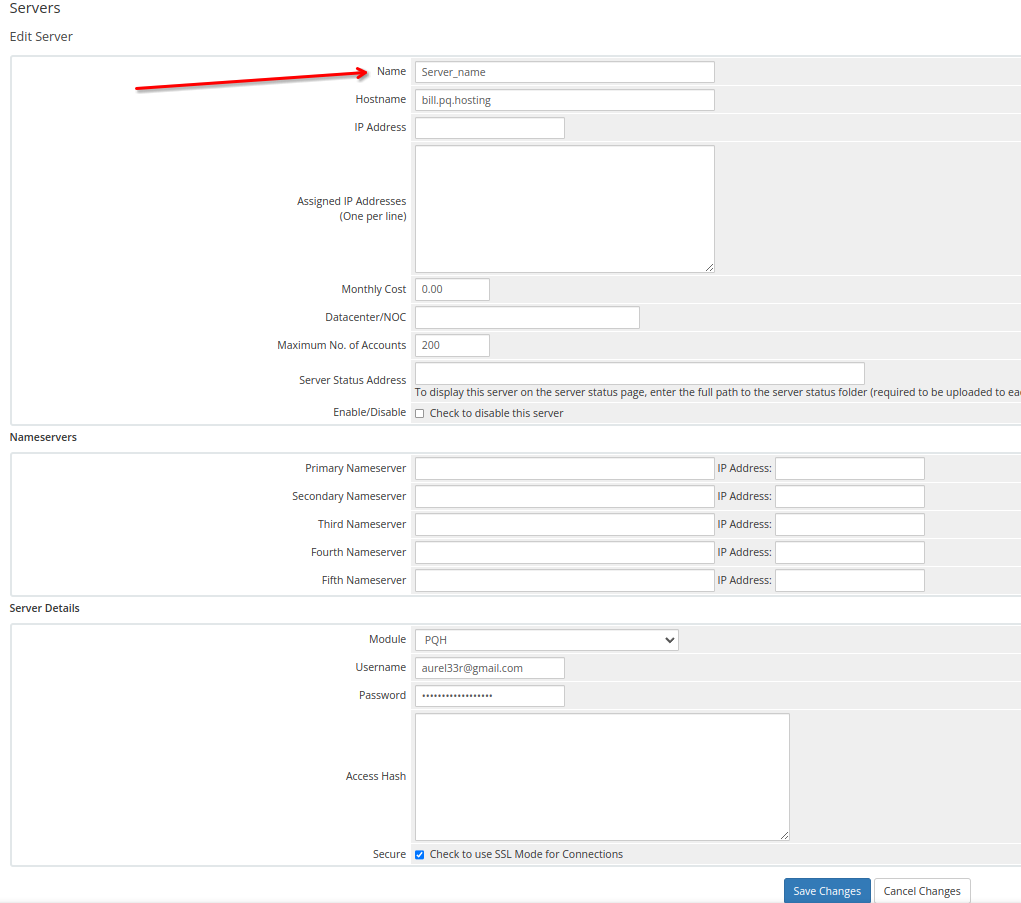
Then on the next page you need to enter the server name (your choice) and click Save Changes.
STEP 4. Module Administrator
We need to create a new administrator.
This can be done by going to settings/manage admins
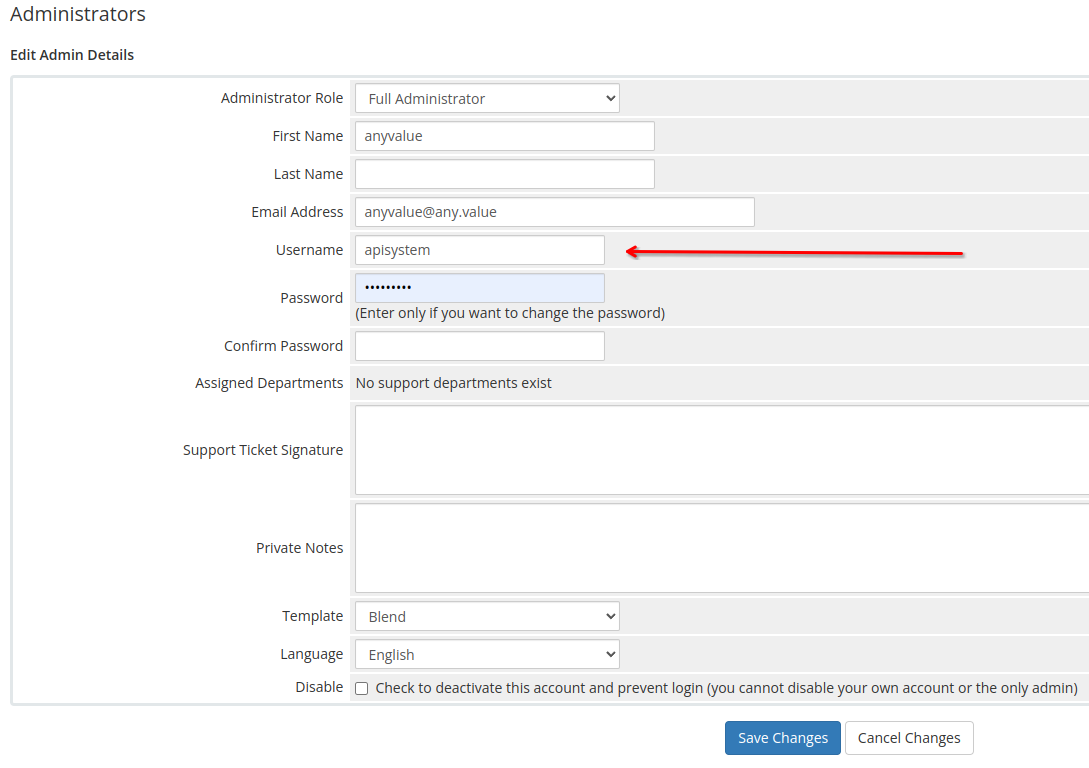
Then click on Add New Administrator
Role: Full administrator
Username (mandatory!): apisystem
The rest of the data is up to you
Example (screenshot below)
STEP 5. Additional fields
You can customize such fields as the choice of operating system at purchase by going to settings/system settings/Configurable Options
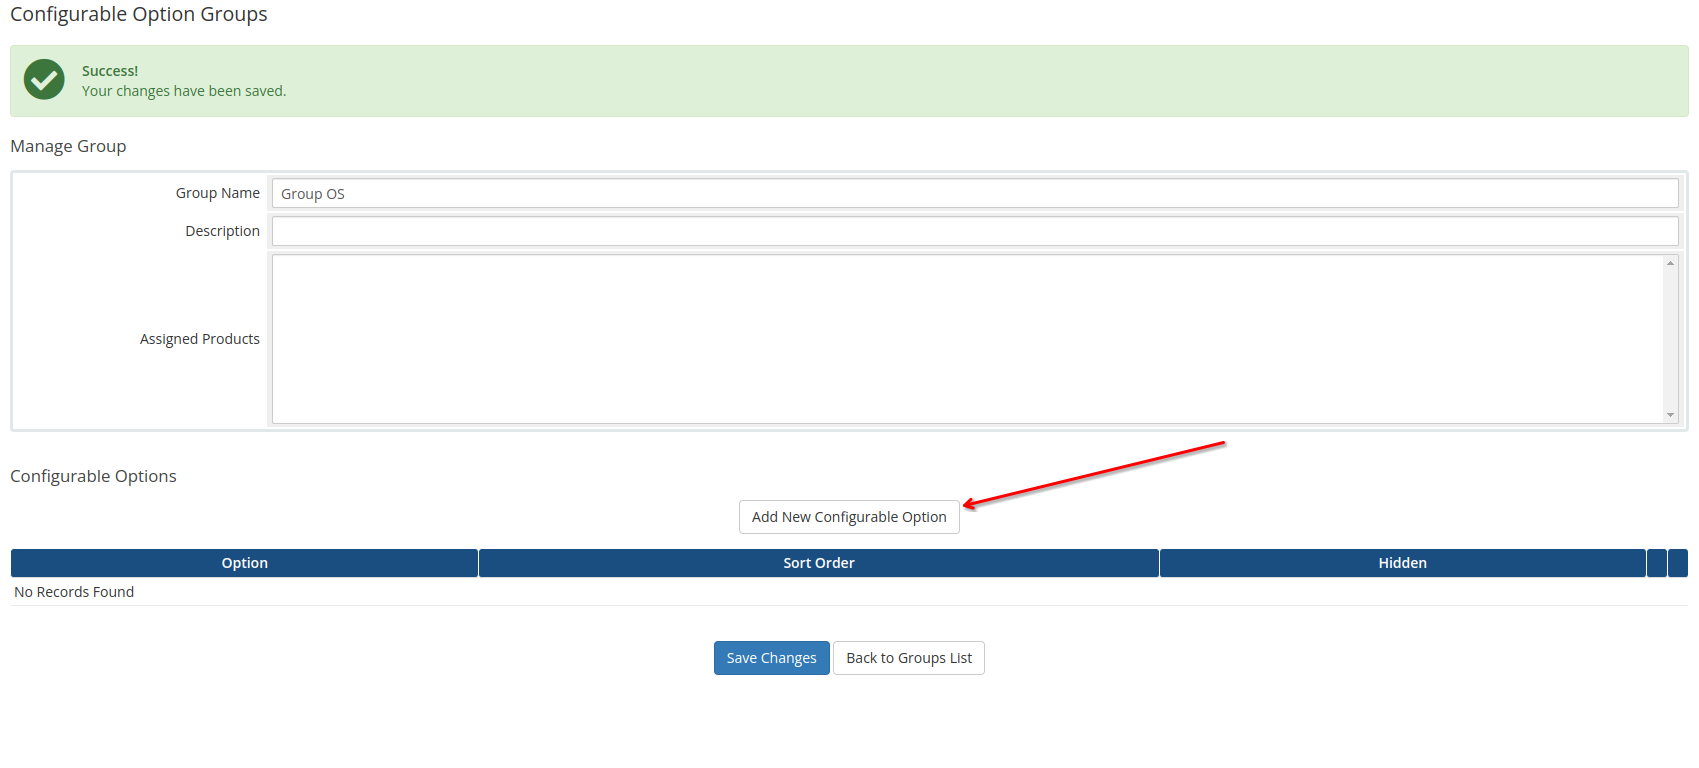
Click the Create a New Group button, then set the name of the group as you wish, and click the Save Changes button.
and click Save Changes, then click the button that appears Add New Configurable Option.
Then in the pop-up window enter in the Option Name field: "VM Template".
Then add the value in the Add Options field.
Here is a list of all the supported values:
VM6_ISPsystem_Alma-Linux-8
VM6_ISPsystem_Alma-Linux-9
VM6_ISPsystem_Astra-Linux-CE
VM6_ISPsystem_CentOS-8-Stream
VM6_ISPsystem_CentOS-9-Stream
VM6_ISPsystem_Debian-10
VM6_ISPsystem_Debian-11
VM6_ISPsystem_Debian-12
VM6_ISPsystem_FreeBSD-12
VM6_ISPsystem_FreeBSD-13
VM6_ISPsystem_Oracle-Linux-8
VM6_ISPsystem_Rocky-Linux-8
VM6_ISPsystem_Ubuntu-18.04
VM6_ISPsystem_Ubuntu-20.04
VM6_ISPsystem_Ubuntu-22.04
VM6_ISPsystem_VzLinux-8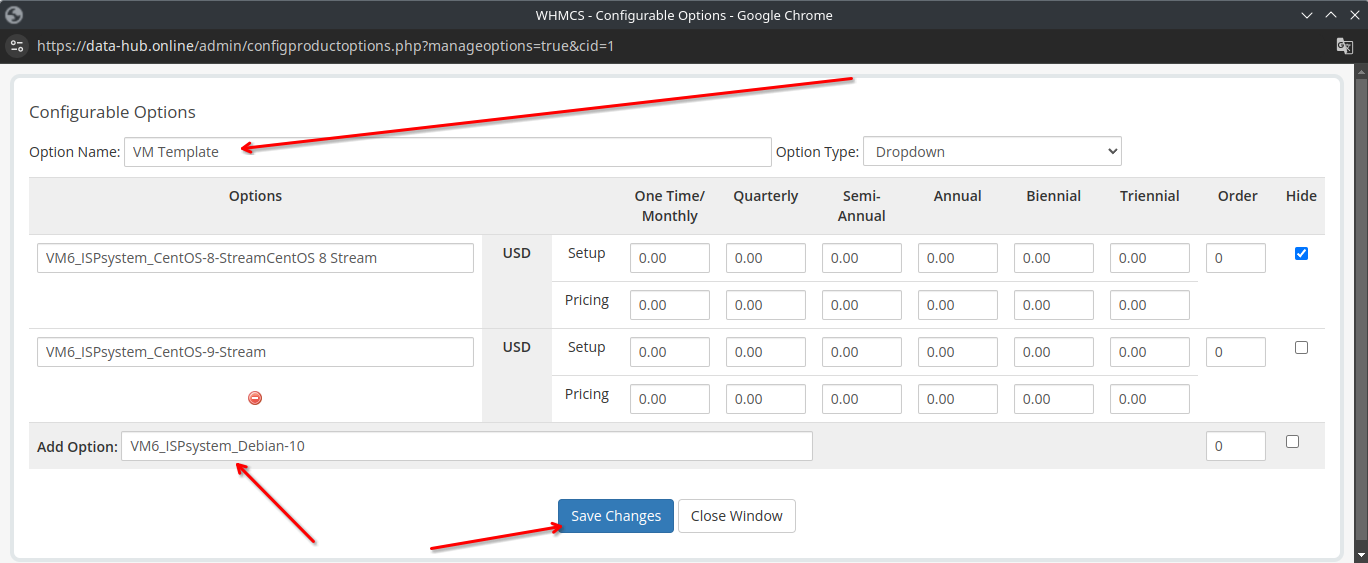
Click Save Changes in both this tab and the Configurable Option Groups tab.
STEP 6. Adding Products
Go to Settings/System settings/ Products,Services
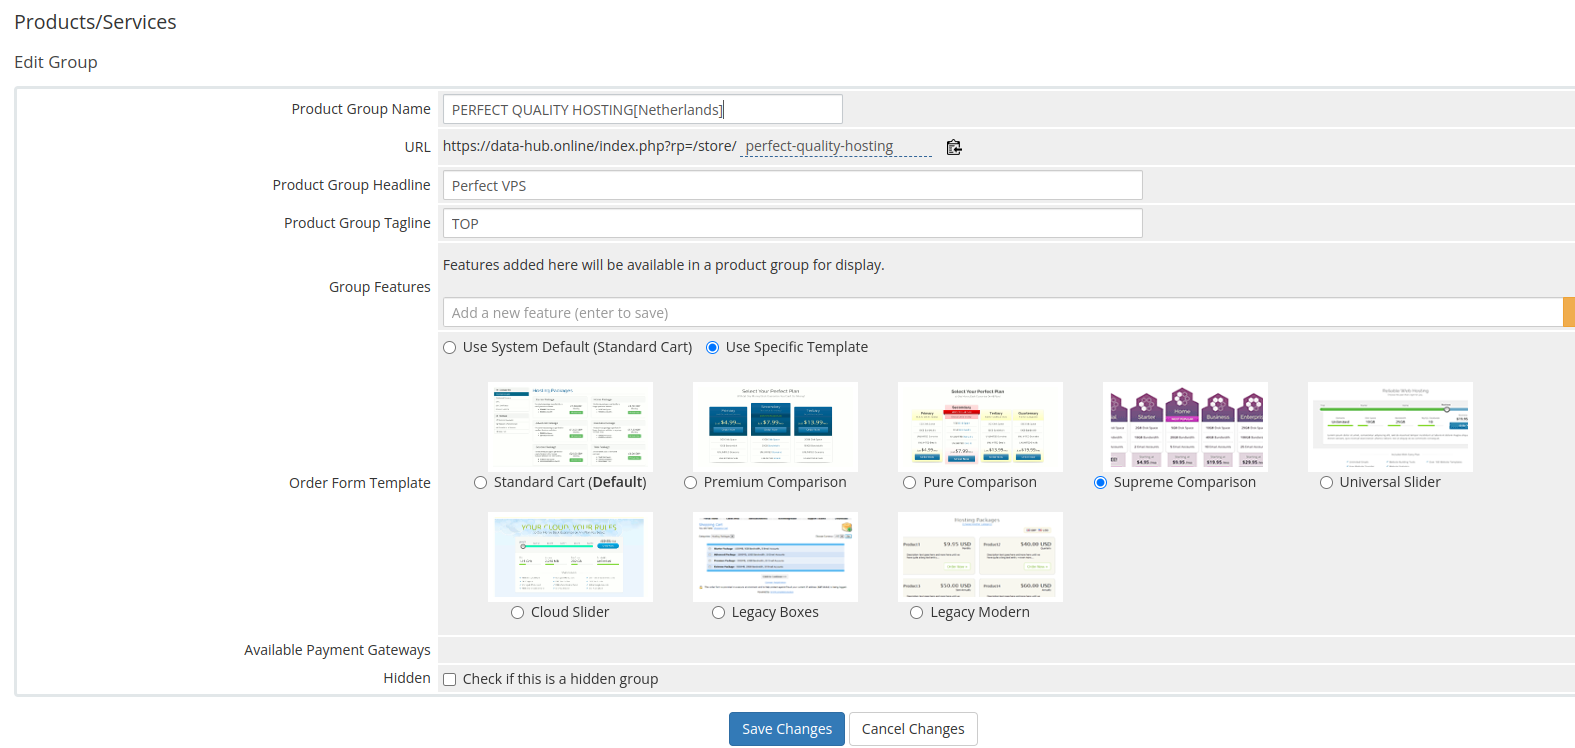
Create a new group by clicking Create a New Group.
Then fill in the fields as you see fit
 Save and go to Settings/System settings/ Products,Services again.
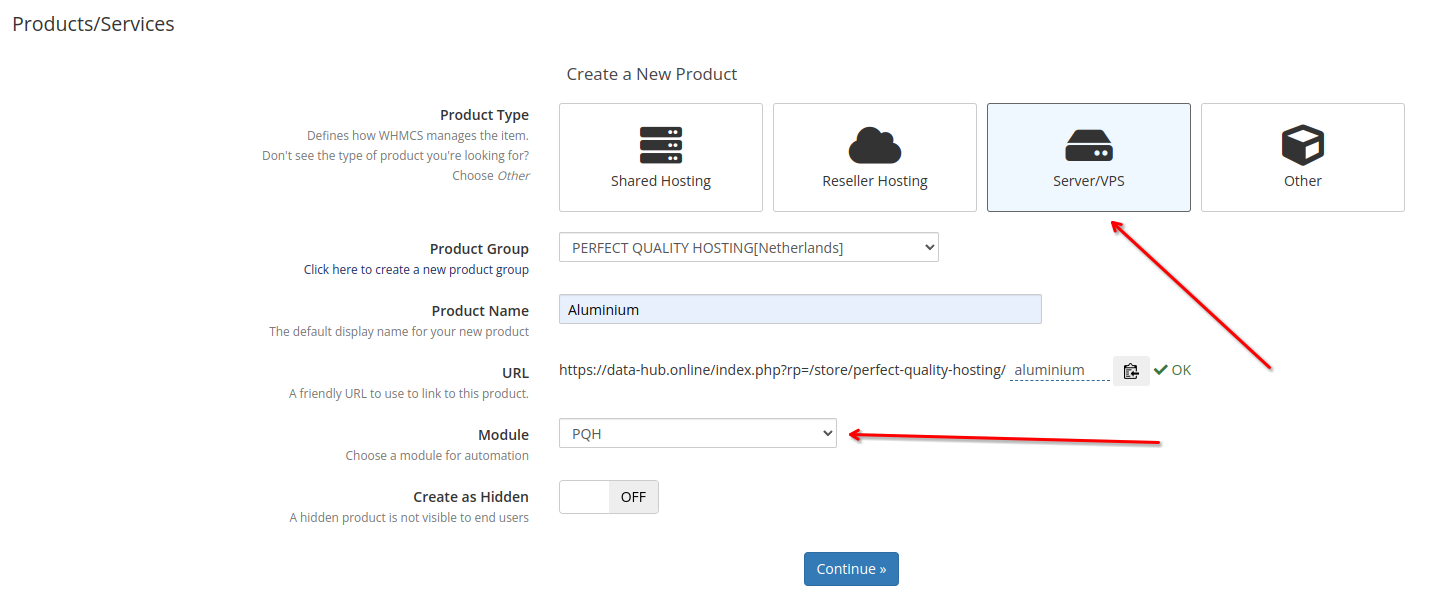
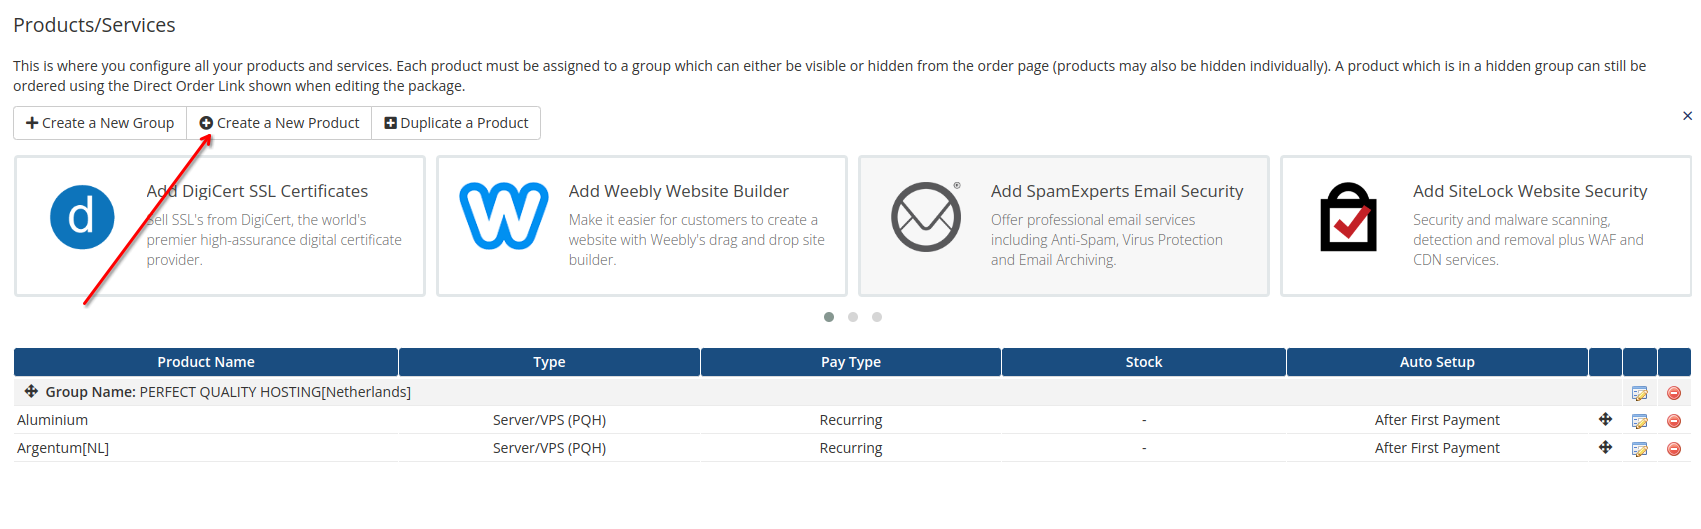
- Click on Create a New Product
- Then (be sure to) select
- Product Type: Server/VPS
- Module: PQH
Fill in the rest as you see fit
After saving, you can customize this product
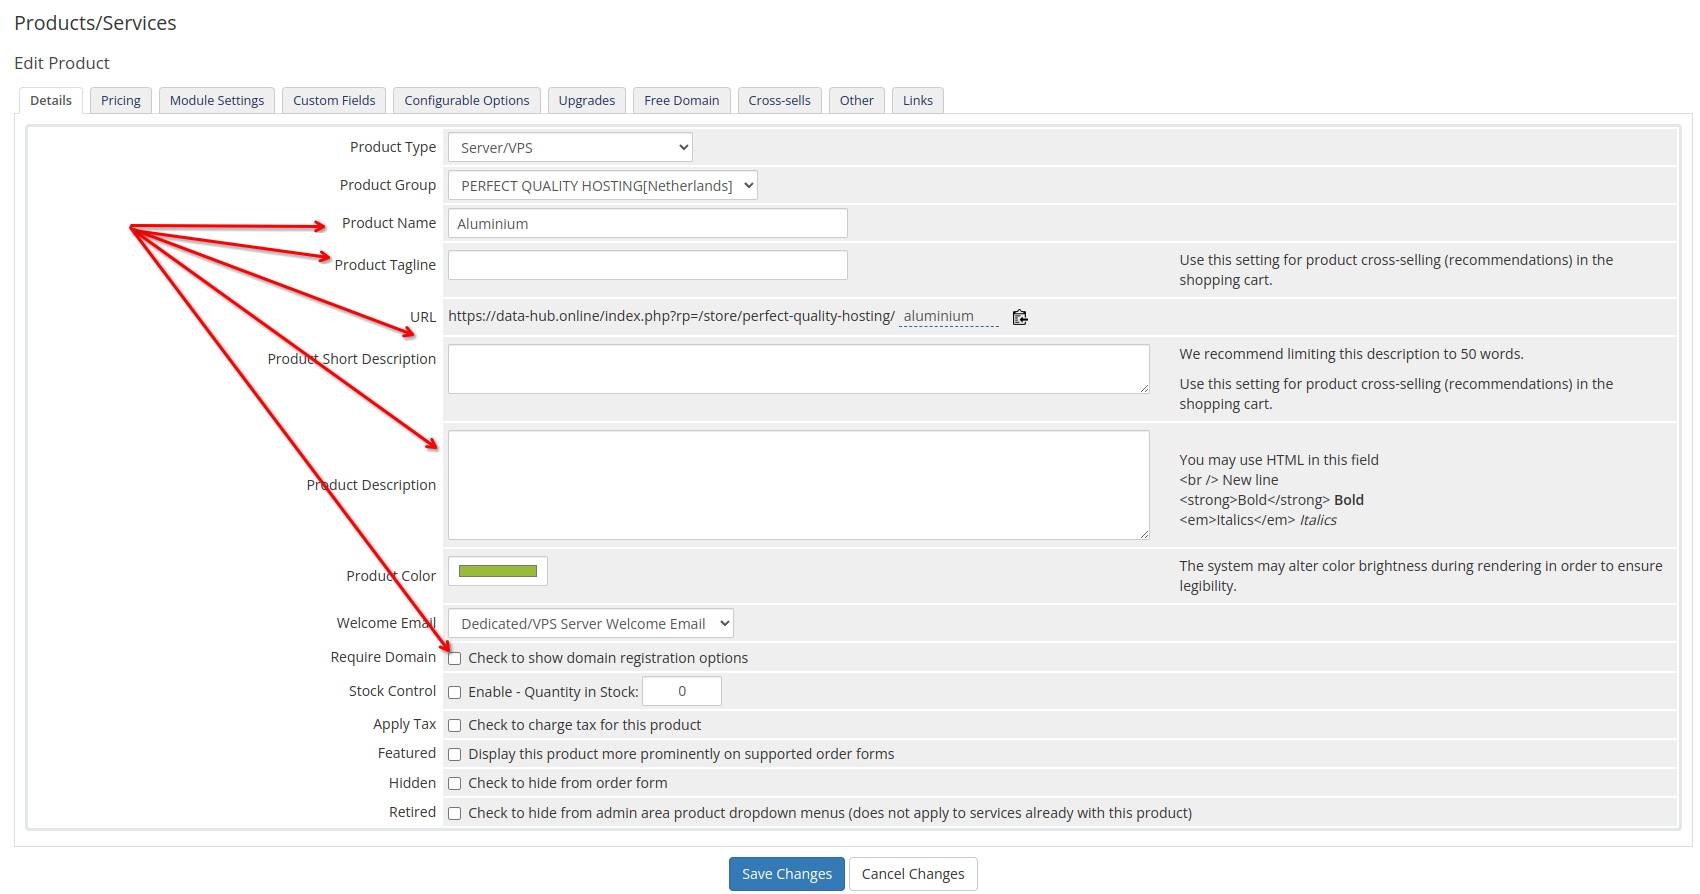
In the Details tab (screenshot below) you can customize the product as you wish (Product Name,Product Tagline, Product Short Description, Product Description).
Checkbox in Require Domain value should be unchecked.
Don't forget to save the product settings
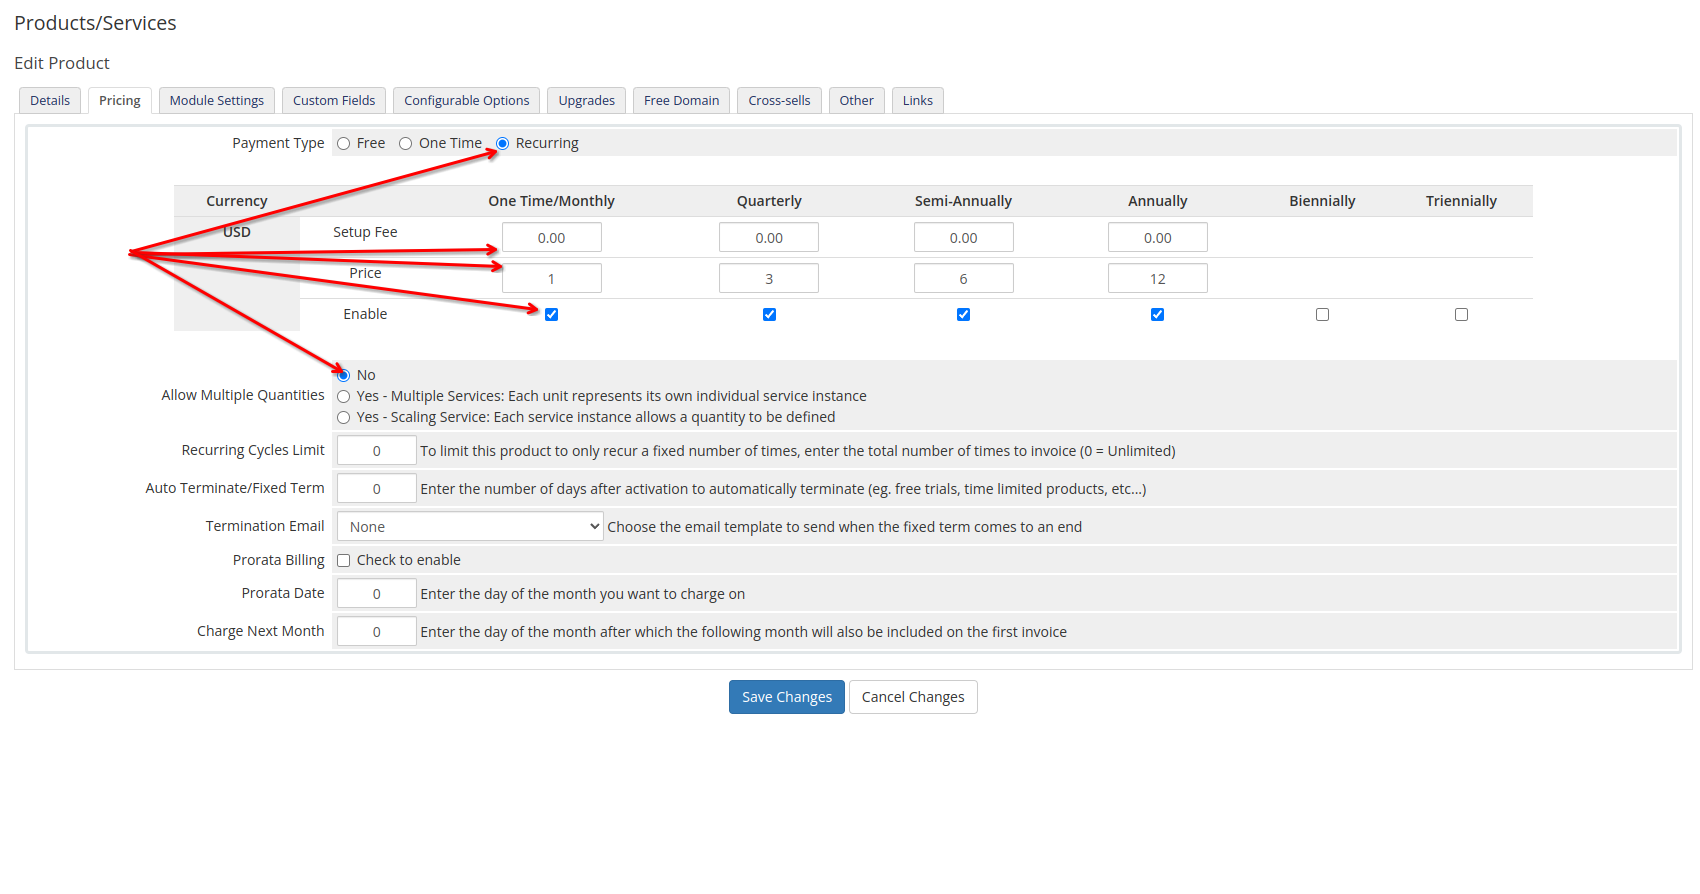
In the Pricing tab (screenshot below), you can customize the payment for the product. Don't forget to save the product settings
In the Module Settings tab (screenshot below)
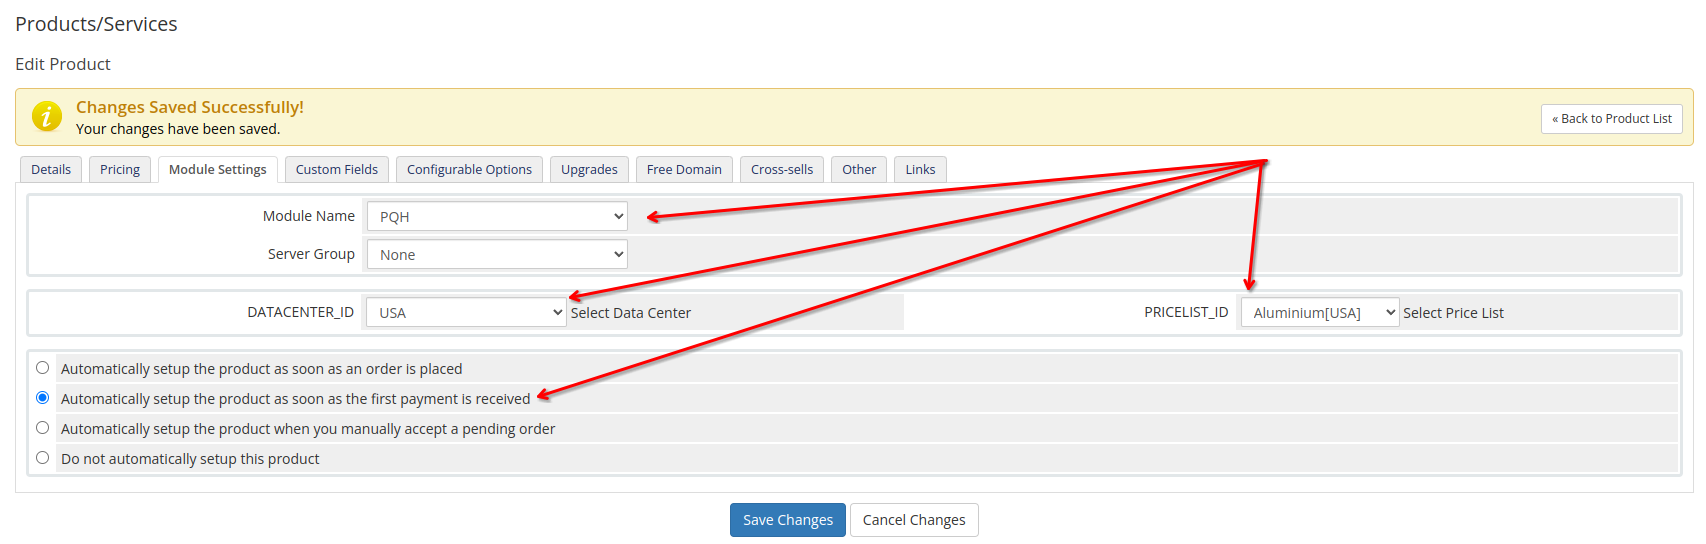
Select (mandatory) Module Name: PQH
Then select the data center and rate that will match this product.
Don't forget to save the product settings
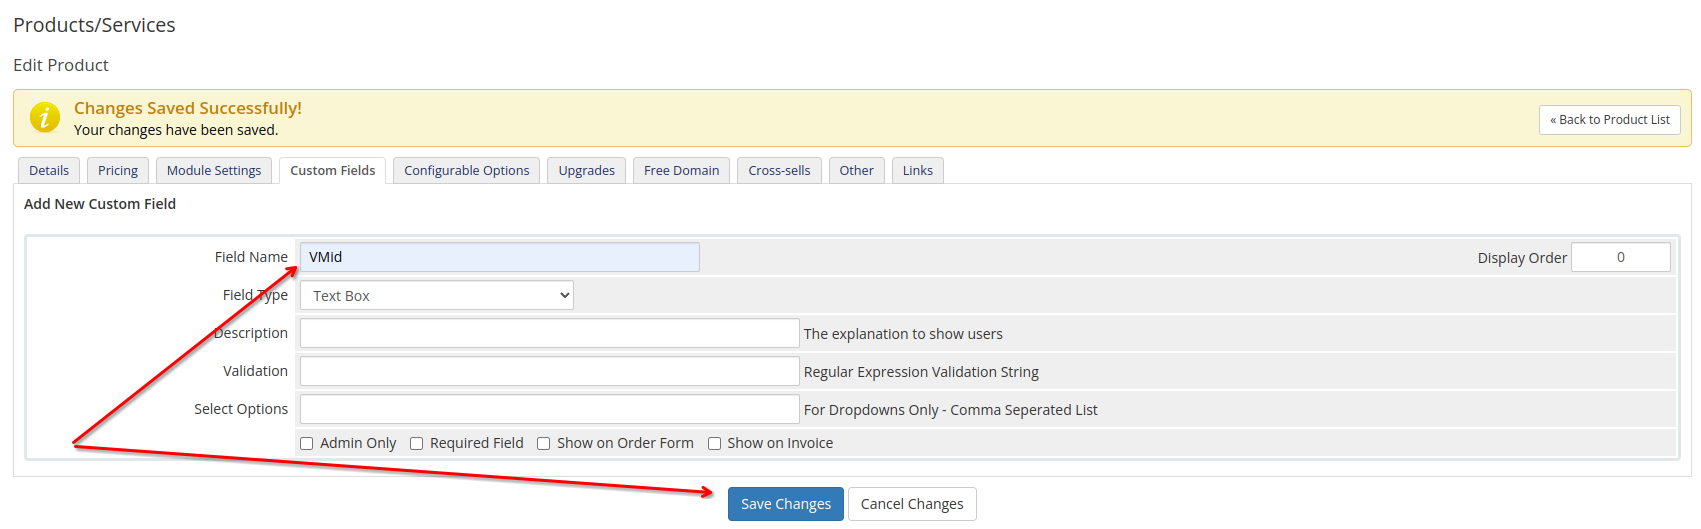
In the Custom Fields tab (screenshot below), MUST insert the value "VMid" in the Field Name field
Customize the rest of the tabs as you see fit.
Further, to simplify the process of adding products, we can duplicate them (screenshot below).
STEP 7. Testing
Create a user, fund his account and try to order a service from the test account. When ordering by the user, the module will pass all the parameters to BILLmanager, order the server automatically and when the server is activated on the BILLmanager side, the service will be activated on the WHMCS side as well.