


A black screen during Remote Desktop connection to Windows servers is one of the most frustrating issues faced by VPS and dedicated server users. The problem can appear suddenly, even if everything was working perfectly before. This guide covers the main causes of RDP black screen issues and effective methods to resolve them.
Why Black Screen Occurs During RDP Connection
The RDP black screen problem has several common causes:
Graphics driver conflicts — Windows uses the WDDM (Windows Display Driver Model) driver to render the remote desktop display. In certain system configurations, this driver works unstably, resulting in a black screen instead of the desktop.
Bitmap caching — The Persistent Bitmap Caching feature is designed to speed up remote connections, but when connecting to systems with different screen resolutions, it can cause display conflicts.
Screen resolution incompatibility — Attempting to connect with a resolution that isn't supported by the remote system often leads to a black screen.
UDP protocol issues — Starting with Windows 10 version 1809 and Windows Server 2019, the URCP protocol can cause conflicts when transmitting graphics data.
Remote Desktop Services failures — The Remote Desktop Services sometimes hang or work incorrectly, blocking normal screen display.
Method 1: Emergency Recovery Through Task Manager
When you've already connected to the server but only see a black screen, first try invoking Task Manager:
- Press the Ctrl + Alt + End key combination (on some systems you may need Ctrl + Alt + Fn + End)
- If the lock screen appears, select Task Manager
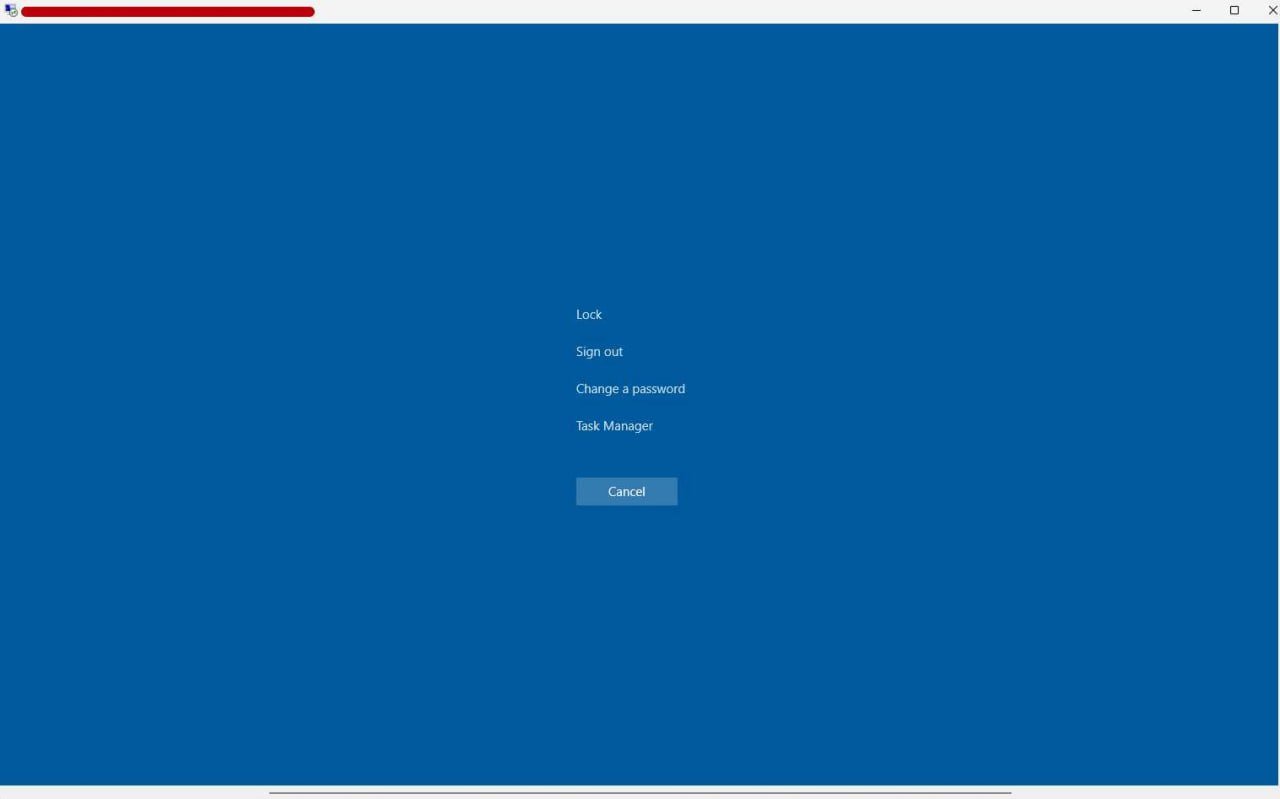
- In Task Manager, go to the Details tab
- Find the explorer.exe process, right-click and select End task
- Then in the Task Manager menu, select File → Run new task
- Enter the command
C:\WINDOWS\explorer.exeand click OK
This method restarts Windows Explorer and in most cases restores the desktop display.
Method 2: Adjusting Display Settings Before Connection
Often the problem can be prevented before connecting to the server by properly configuring the RDP client settings:
- Open the Remote Desktop Connection application
- Before clicking Connect, click Show Options
- Go to the Display tab
- Set the screen resolution to a medium value (for example, 1920×1080 instead of maximum)
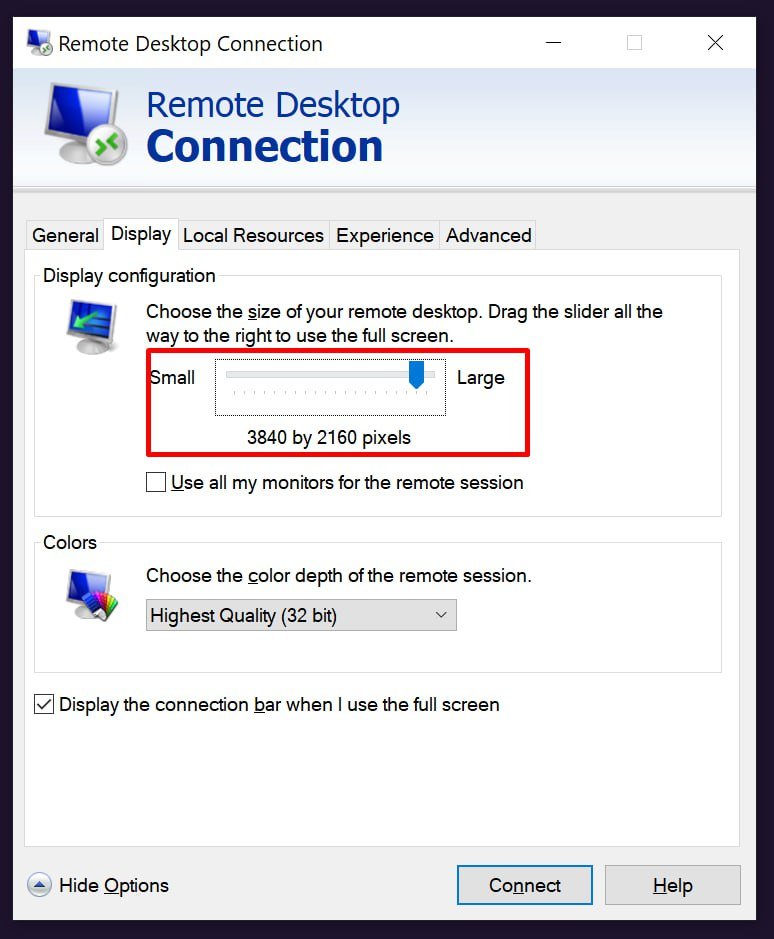
- In the Colors section, choose True Color (24 bit) or High Color (16 bit) instead of Highest Quality (32 bit)
- Click Connect
Reducing resolution and color depth decreases the load on the graphics subsystem and often resolves the black screen issue.
Method 3: Disabling Persistent Bitmap Caching
Bitmap caching is a common cause of black screens. To disable this feature:
- In the Remote Desktop Connection window, click Show Options
- Go to the Experience tab
- Uncheck the Persistent bitmap caching option
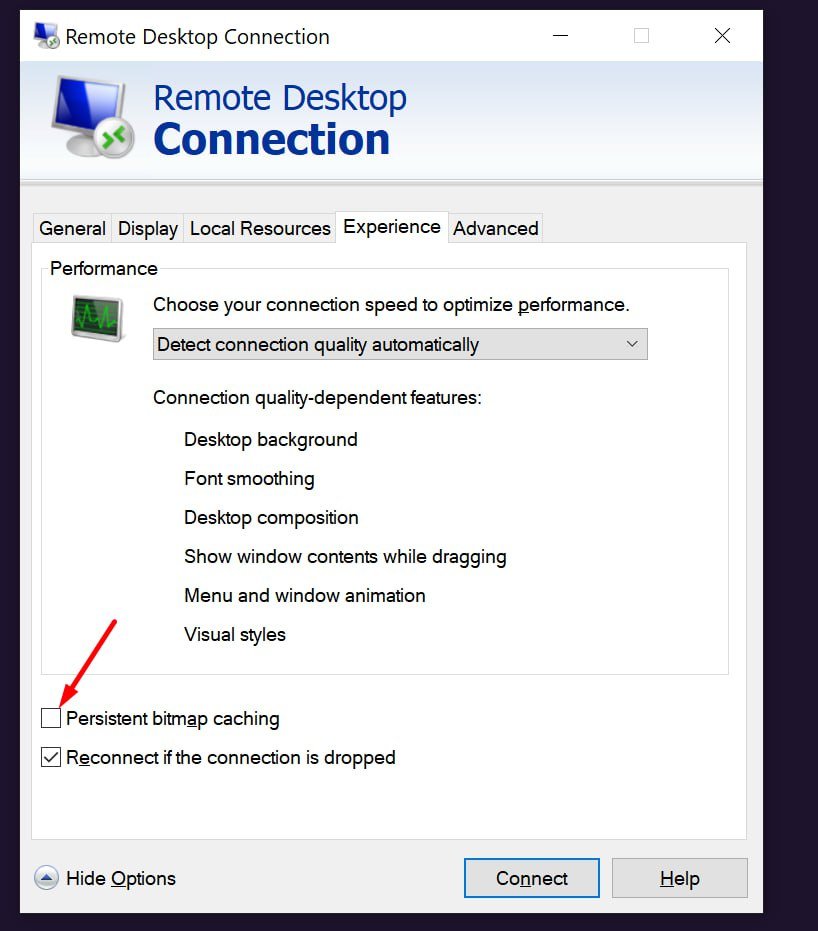
- Try connecting again
Disabling caching may slightly slow down remote desktop performance but will eliminate display conflicts.
Method 4: Switching to XDDM Driver via Group Policy
This is one of the most effective methods for resolving black screen issues in Windows 10 and Windows Server 2016/2019:
- On the remote server (via VNC or KVM console), press Win + R
- Type
gpedit.mscand press Enter to open Group Policy Editor - In the navigation tree, follow this path: Computer Configuration → Administrative Templates → Windows Components → Remote Desktop Services → Remote Desktop Session Host → Remote Session Environment
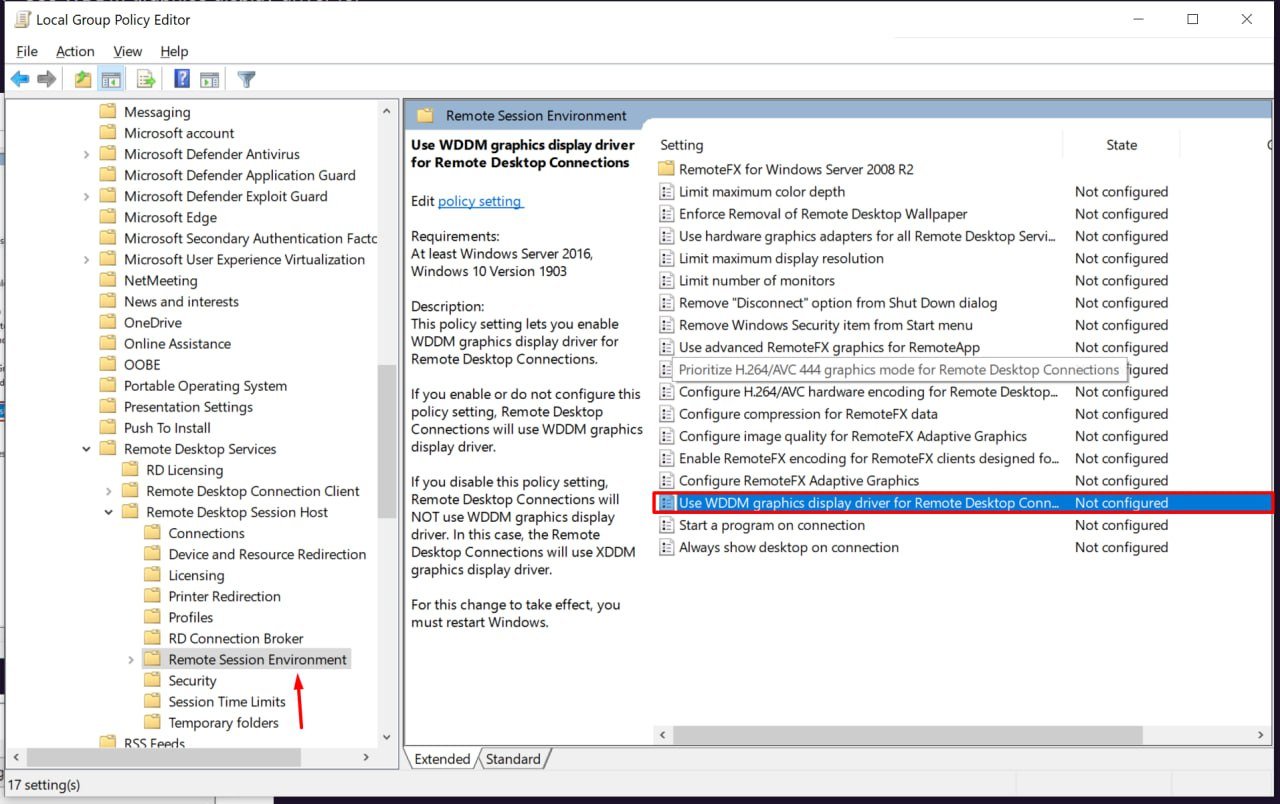
- Find the "Use WDDM graphics display driver for Remote Desktop Connections" setting
- Double-click it and select Disabled
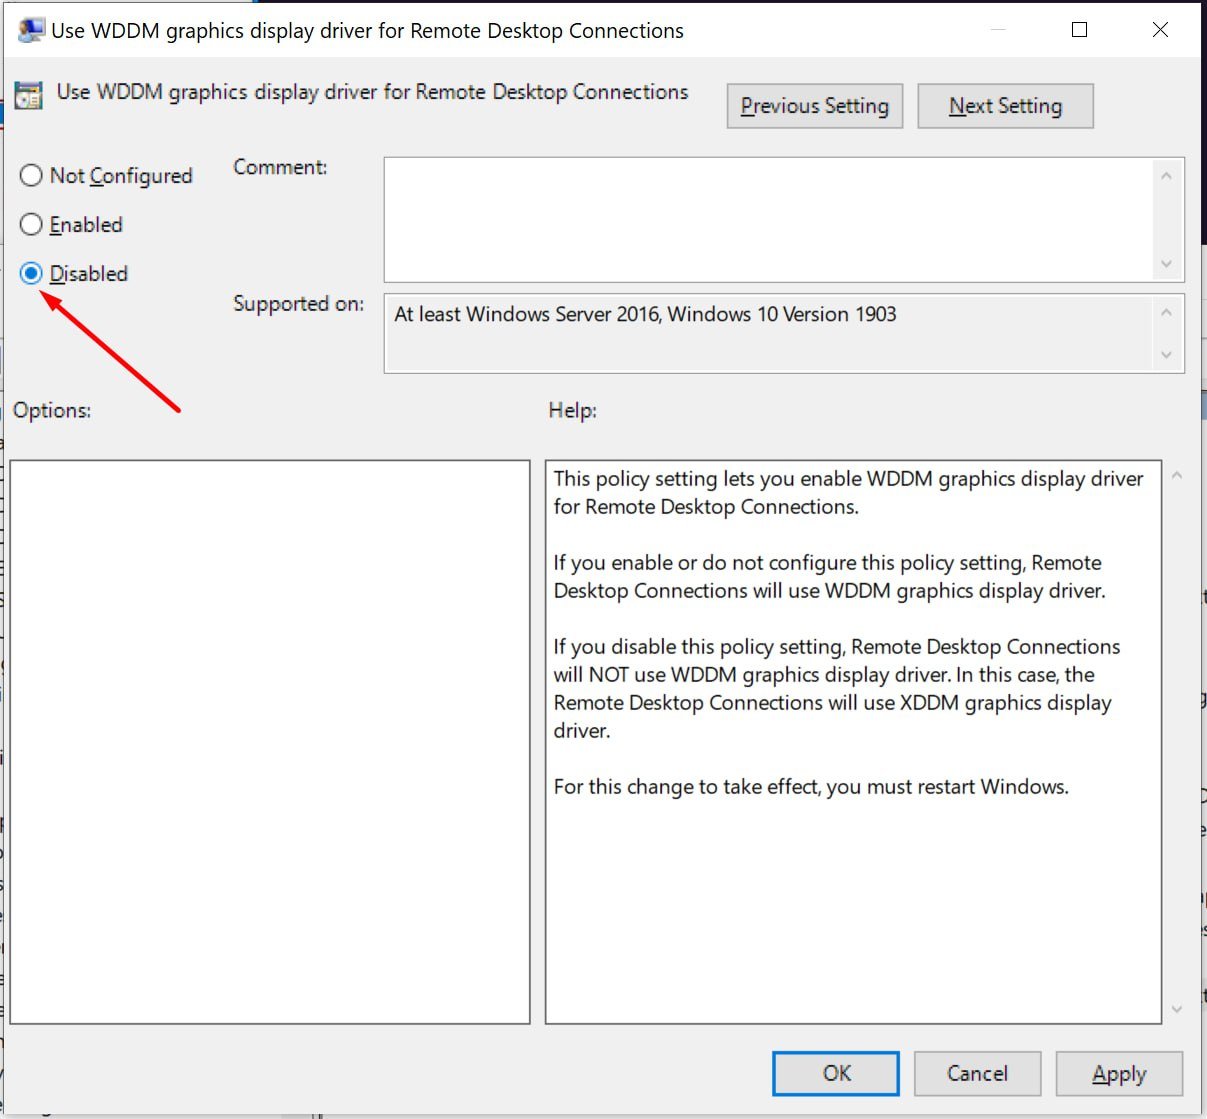
- Click Apply and OK
- Restart the server
Alternative: Registry Modification
If Group Policy access is unavailable, you can change the setting through the Windows registry:
reg add "HKLM\SOFTWARE\Policies\Microsoft\Windows NT\Terminal Services" /v "fEnableWddmDriver" /t REG_DWORD /d 0 /fAfter executing the command, a system reboot is also required.
Method 5: Disabling UDP Protocol
The UDP protocol for RDP connections can cause display issues on modern Windows versions:
Through RDP client:
- On the local computer (from which you're connecting), press Win + R
- Type
gpedit.msc - Navigate to: Computer Configuration → Administrative Templates → Windows Components → Remote Desktop Services → Remote Desktop Connection Client
- Find the "Turn Off UDP On Client" setting
- Set it to Enabled
Through registry on the server:
New-ItemProperty "HKLM:\SOFTWARE\Microsoft\Terminal Server Client" -Name UseURCP -PropertyType DWord -Value 0Method 6: Restarting Remote Desktop Services
Sometimes the Remote Desktop Services gets stuck or works incorrectly. To restart:
- Connect to the server via VNC or KVM console
- Press Win + R and type
services.msc - Find the Remote Desktop Services (TermService) service
- Right-click and select Restart
Alternatively, through PowerShell:
Restart-Service -Name TermService -ForceIf the service won't stop using standard methods:
Find the process PID:
tasklist /svc | findstr /C:TermServiceForce terminate the process (replace PID with actual number):
taskkill /F /PID [process_id]Start the service again:
net start TermServiceMethod 7: Updating Graphics Drivers
Outdated or corrupted graphics adapter drivers often lead to RDP issues:
- Connect to the server via VNC or KVM
- Open Device Manager: Win + X → Device Manager
- Expand the Display adapters section
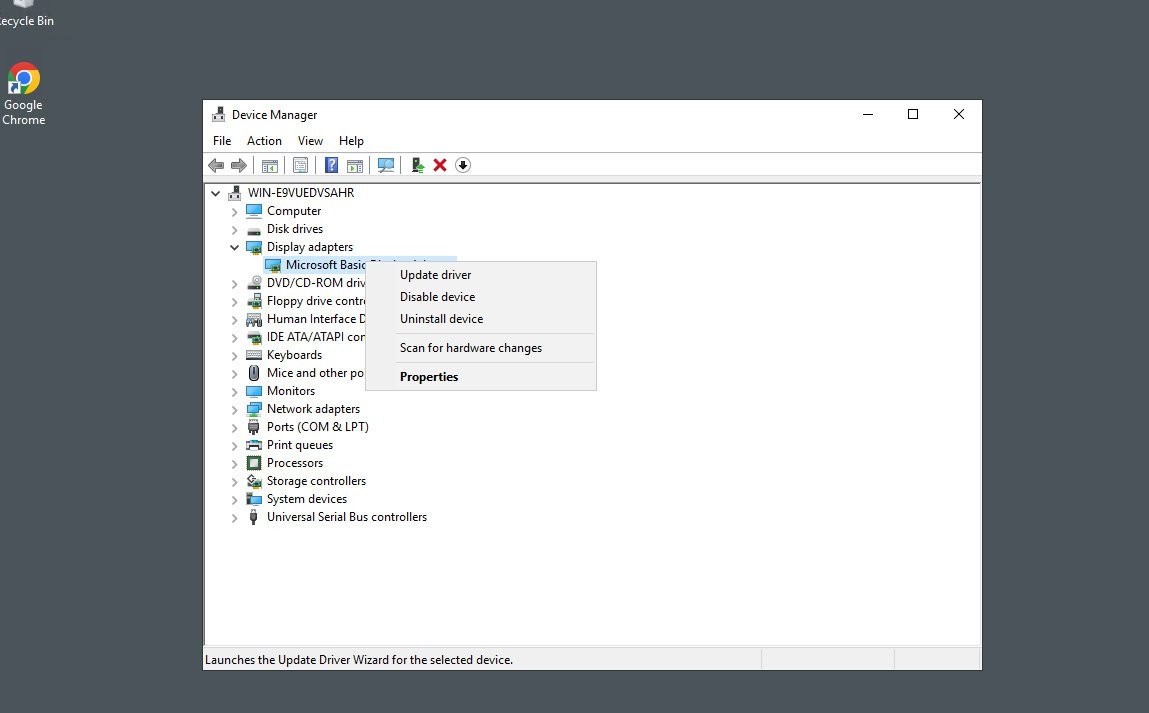
- Right-click on the adapter and select Update driver
- Choose Search automatically for drivers
- After updating, restart the system
Additional Recommendations
Check MTU settings — Ensure that MTU values on the server, client, and network equipment between them match. MTU mismatch can cause issues with graphics data transmission.
Disable data compression — In the Local Group Policy Editor, you can disable RDP session data compression, which sometimes resolves the black screen issue.
Check Event Viewer — Open Event Viewer and check logs for errors related to Remote Desktop Services or graphics drivers.
Use alternative resolution — With each new connection, slightly change the screen resolution in RDP settings. This helps bypass caching issues.
Conclusion
Black screen during RDP connection is an unpleasant but solvable problem. In most cases, switching from WDDM driver to XDDM via Group Policy or disabling Persistent Bitmap Caching helps. If these methods don't work, sequentially try other solutions from this guide.
Remember that applying changes to driver and service settings always requires a system reboot. When working with production servers, always plan maintenance windows in advance.
If the problem persists after applying all methods, there may be a conflict at the virtualization level or specific hardware incompatibility. In such cases, we recommend contacting your hosting provider's technical support for detailed diagnostics.